
Authorization Code Authentication using Python
To work with the FHIR API you first need to authenticate the application and the user via SMART-on-FHIR OAuth. The process happens in a few simple steps:
- Set up and publish a SMART-on-FHIR client.
- Get an authorization code.
- Trade the authorization code for a token.
- Use the token to access the FHIR API.
Once you complete these steps, you’ll be able to execute the actions made by users of your SMART-on-FHIR application. We’ve provided more detail and some sample Python code to show you how this works.
Set up and publish a SMART on FHIR client
A detailed step-by-step guide is here in the App Registration section.
Get an authorization code
Once the app is published, copy the client ID for the app which can be found on the Apps list on the Developer Dashboard.
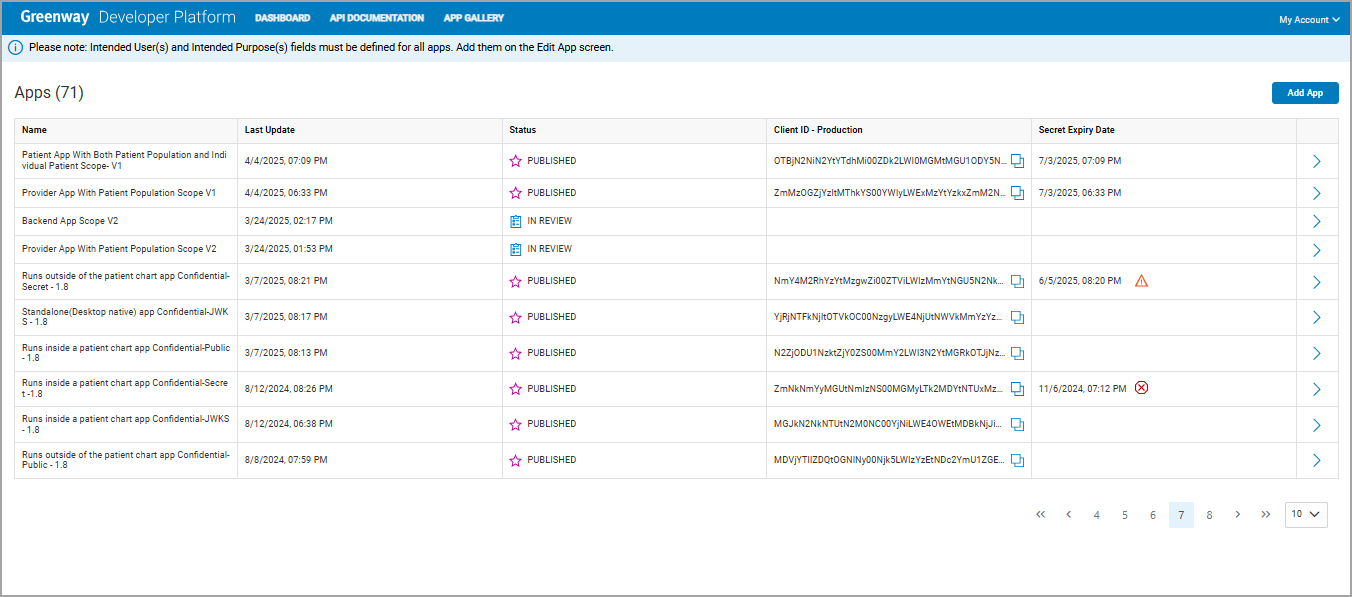
Dev Platform App Dashboard
Note
- Secret Expiring Soon: This icon indicates that an app's secret will expire within the next 15 days.
- Secret Expired: This icon indicates that an app's secret has already expired.
When the app is launched by the user, to get an authorization code, the user clicks a link that triggers a GET request to the following address, with your app’s client ID and other info filled in instead of the blanks. (We’ve got some sample code you can use to do this further down in this guide.)
https://auth-api.login.greenwayhealth.com/oauth2/auth-code?response_type=code&client_id=___&scope=_____redirect_uri=______ &aud=https://fhir-api.fhirprod.aws.greenwayhealth.com/fhir/R4/__________The address is our Authorization server. You can always obtain this address by querying the FHIR server’s /. well-known/smart-configuration or /metadata endpoint in any API tool or by using the following cURL command.
Greenway Health’s FHIR servers return the /.well-known endpoints as a format most web browsers will not recognize. Instead, please query this end point via API call to obtain the details.
https://fhir-api.fhirprod.aws.greenwayhealth.com/fhir/R4/{tenant_id}/. well-known/smart-configurationYou cannot query directly using a web browser.
The abovementioned auth-code request will trigger a user login and, once the user is authenticated, will result in a consent screen that presents the user with the scopes (permissions) that your app requires. (You declared these scopes on the Developer Platform App Dashboard when you created the app). Once the user approves the scopes request, they are redirected back to the Redirect URL you provided on the App Dashboard when you created the app, and the app then retrieves a token (we will see that in the next step).
Here is some sample code that you can use to authorize a request [LINK]. It’s a Python/Flask app that generates a token which is available in the console and browser. You can then add your own code to the sample to use the token, or simply access the functionality as is, using the browser and copying the token for use with the command line tools like cURL.
To run the sample, you will need to generate a Self-signed Certificate and a Private Key (if you don’t already have SSL set up)
openssl req -x509 -nodes -days 365 -newkey rsa:1024 -keyout pkey.pem -out cert.crtOnce you have the SSL set up you can configure and then run the sample Flask app with our security endpoints to test the OAuth flow.
Be sure to update the information in the Flask app.
Here is an example of what the auth-code link looks like. (This is the same link as found in the “Authenticate” button in the launch.html file that the Flask app serves):
<a href=”https://auth-api.login.greenwayhealth.com/oauth2/auth-code?client_id=XXXXXXXXXXXX&response_type=code&&scope=user%2FPatient.read%20openid%20fhirUser &aud=https://fhir-api.fhirprod.aws.greenwayhealth.com/fhir/R4/YYYYYYYYYY” >Authenticate</a>Once you run the Flask app, click the button through to the authentication screen and then authenticate, you’ll see the auth code in the first few lines output on the terminal similar to the output below:
$ python3 ssl_server.py
 * Serving Flask app 'ssl_server'
 * Debug mode: on
WARNING: This is a development server. Do not use it in a production deployment. Use a production WSGI server instead.
 * Running on all addresses (0.0.0.0)
 * Running on https://127.0.0.1:4567
 * Running on https://192.168.255.206:4567
Press CTRL+C to quit
 * Restarting with stat
 * Debugger is active!
 * Debugger PIN: 823-965-749
192.168.255.206 - - [06/Sep/2022 17:28:41] "GET / HTTP/1.1" 200 -
192.168.255.206 - - [06/Sep/2022 17:28:41] "GET /AuthButton.png HTTP/1.1" 200 -
CODE: AXVYHSAhFvof2W-A5LOuyJ-bBJV3ulSfh8A59mFp
STATE: 42f8cdab
Trade the authorization code for a token
The app then exchanges the authorization code for an OAuth access token.
The full output on the terminal:
$ python3 ssl_server.py
 * Serving Flask app 'ssl_server'
 * Debug mode: on
WARNING: This is a development server. Do not use it in a production deployment. Use a production WSGI server instead.
 * Running on all addresses (0.0.0.0)
 * Running on https://127.0.0.1:4567
 * Running on https://192.168.255.206:4567
Press CTRL+C to quit
 * Restarting with stat
 * Debugger is active!
 * Debugger PIN: 823-965-749
192.168.255.206 - - [06/Sep/2022 17:28:41] "GET / HTTP/1.1" 200 -
192.168.255.206 - - [06/Sep/2022 17:28:41] "GET /AuthButton.png HTTP/1.1" 200 -
CODE: AXVYHSAhFvof2W-A5LOuyJ-bBJV3ulSfh8A59mFp
STATE: 42f8cdab
ACCESS TOKEN: eyJhbGciOiJSUzI1NiIsImtpZCI6IjNxMC1RMElKd1ltRnhzNlNZVXRPbEdrTnRhTSIsInBpLmF0bSI6InZ1dTMifQ.eyJzY29wZSI6InVzZXIvUGF0aWVudC5yZWFkIG9wZW5pZCBmaGlyVXNlciIsImNsaWVudF9pZCI6Ik16a3pOamswTmpFdE5UUmtNaTAwTVRNM0xUZ3dZMll0WW1WbVl6QTJabVUzWW1RdyIsImlzcyI6Imh0dHBzOi8vYXV0aC1hcGkuZ2lzZGV2LmF3cy5ncmVlbndheWhlYWx0aC5jb20vb2F1dGgyIiwic3ViIjoiM2VjMWZlMjktNGM5Mi00YjNjLTk3OGUtNjBkMjhlMmRhZWUwIiwicHJhY3RpY2UiOiIyMDEiLCJyb2xlIjoiVVNFUiIsInBlcnNvbmEiOiJwYXRpZW50IiwiZ2l2ZW5OYW1lIjoiVG9kMjY1Iiwib2lkIjoiIiwiZmhpclVzZXIiOiJQYXRpZW50L3VuZGVmaW5lZCIsInV1aWQiOiIzZWMxZmUyOS00YzkyLTRiM2MtOTc4ZS02MGQyOGUyZGFlZTAiLCJhdWQiOiJodHRwczovL2ZoaXItYXBpLmZoaXJkZXYuYXdzLmdyZWVud2F5aGVhbHRoLmNvbS9maGlyL1I0LzIuMTYuODQwLjEuMTEzODgzLjMuMTQwLjMwNDM0IiwiZmFtaWx5TmFtZSI6IktvemV5MzcwIiwiZW1haWwiOiJUb2QyNjUuS296ZXkzNzBAZG9tYWluLmNvbSIsInRlbmFudCI6IjIuMTYuODQwLjEuMTEzODgzLjMuMTQwLjMwNDM0IiwidXNlcm5hbWUiOiJUb2QyNjUiLCJleHAiOjE2NjI1MDMzMzd9.DsG8bVXXmhatX_48EU04e3wsbXkJG7YsT1b2TVcDYM73EudQApJW-AoVvvriIEpB5B8iM0zboy7yFvAmf2w-hcYi4pEoQD-DhjosYioHveNmn6wlDB2eFRsji0FLCYrx5-Mjk9r3HTcyXF5e3qNNVh4s2_WKXTMeQDfGA5R2lgCyxiFykgkWiRYkX0qCBxIe5VpHLAQY31jHHC0QDasaulplHBH6gOXnSuoSPRLEYZhKc4PnvGsp8aUyg4RXWl_bBQFME7JpaomI5LEN7v9E8y3vPGB6Ne-edq9OQwG8CHhjqzyotc2vBdRaxa20LPNxYXYnDD7nQQLPPb4mFVagmw
Behind the scenes above, the app has performed a POST to the token endpoint with the authorization code it received from the auth-code request
Use the token
Once you have the authorized token you can use it in http calls made in your own Python code to the FHIR API to retrieve data.
A note about Public apps, PKCE, and Confidential appsUsing OAuth and SMART-on-FHIR, we authenticate both the client (via the client ID) and the user (via their login). The example we showed here is a generic authorization code workflow for what is considered a Public client application.
Public applications normally run on the user’s device and do not have a back-end server. Storing a shared secret on the user’s device to authenticate a Public client would not be appropriate; as a user could, in theory, retrieve the secret. As an extra layer of security, we optionally support the Proof Key for Code Exchange (PKCE) which provides a measure of security that compensates for the lack of a client secret and protects against request forgery attacks that intercept the authorization code. Use of PKCE would entail use of additional parameters,
code_challengeandcode_challenge_method=S256on theauth-codecall.As it happens, our Python application runs on a server, that - under normal circumstances - would most likely be properly secured, so we would likely designate it as a Confidential client. That is to say, the app can keep a client secret because the authentication exchange occurs on the back end between the Python server and the FHIR API, out of the reach of the user accessing the application in the browser. Instead of an authorization code, a Confidential application would possess a public/private key pair, whose public key is declared on the Developer Platform. Using its private key, the Confidential app would sign and submit a JWT token to the authentication server. We plan to release a separate tutorial for that, so stay tuned….
Updated about 1 month ago